In a world of constant cyber-attacks, how can you secure your online life without memorizing hundreds of different passwords?
April 27th, 2023
Author: Matt Compton
What is a Password Manager?
Password managers are applications that store passwords and other sensitive information. This makes it so passwords can be more complex without hindering login speed. It also keeps the user from having to remember multiple password variations for each account they have.

What is Bitwarden?
Bitwarden is an Open Source password manager, with easy-to-use mobile apps, browser extensions, and a web portal.
Why Should I Host the Server Myself?
Hosting your own server for the Bitwarden apps/extensions is beneficial for a handful of reasons. The primary reason is control over your password data. Public password management services are the target of constant attacks. (Just search Google News for “LastPass” to see coverage regarding the recent attacks.) While your server might not be any more secure itself, the mere fact that it’s harder to find helps keep your data safe.
Why Vaultwarden Instead of the Official Server?
There are a couple of reasons to use Vaultwarden over the official backend for Bitwarden. The first of which is that the official server is complex to set up, has only incomplete guides, and targets Windows servers with C# services. Vaultwarden, on the other hand, is a Docker-based server, so it can spin up on any server you might already have. Additionally, Vaultwarden allows anyone to use the 2FA features of the Bitwarden apps and browser extensions, which is a paid feature on the official server.
Hosting Options
There are a lot of options for Virtual Private Servers (VPS) that have sufficient resources to run Docker apps, like Vaultwarden.
These prices are current as of 3/28/23, for the lowest specs available. If you encounter performance issues, you may want to consider a higher tier.
- Linode: $5/mo for Nanode 1GB (1GB RAM)
- Hetzner: $4.8/mo for CX11 (1GB ram)
- Atlantic.net: $10/mo for G3.2GB (2GB RAM)
- Vultr: $3.5/mo for 0.5GB of RAM or $5/mo for a full 1GB of RAM
- DigitalOcean: $4/mo for 0.5GB of RAM or $6/mo for 1GB of RAM
Installing Docker
Setting up docker on your VPS will vary depending on the distribution. These steps are specific to Ubuntu, but there are instructions on Docker’s website for a variety of other operating systems.
For anyone on Ubuntu, Ubuntu-server, or derivatives, feel free to follow along!
The first step before installing any new software should always be to make sure that the existing operating system and other packages are up to date. We can do that with:
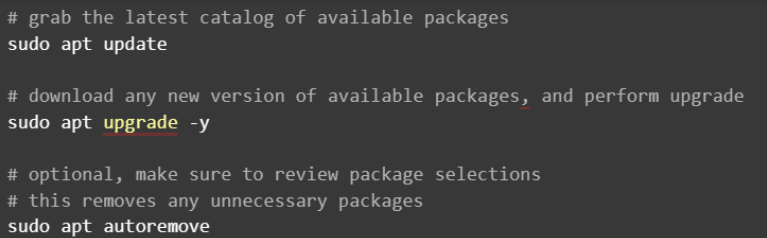
Now, let’s make sure that we have some assorted tools that we’ll need later on. (Most updated Ubuntu versions should have all of these packages already, but it doesn’t hurt to check.

- ca-certificates is a package with the default Certificate Authority files, needed for HTTPS connections. See more: https://packages.ubuntu.com/jammy/ca-certificates
- Curl is a command line tool for downloading files/data over HTTP or HTTPS. See more: https://packages.ubuntu.com/jammy/curl
- Gnupg is a command line tool to work with cryptographic keys, in our case, used to ensure that downloaded packages from Docker are authentic and have not been tampered with. See more: https://packages.ubuntu.com/jammy/gnupg
- lsb-release is a small script to help identify the exact codename for your specific distribution. See more: https://packages.ubuntu.com/jammy/lsb-release
Next, let’s make sure we have the needed directory for third-party keyrings.

Now, we need to download the signing key used to ensure that the Docker packages are legitimate.

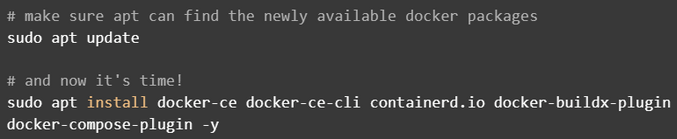
It’s finally time to add the URLs of available Docker packages to our system.

And now, finally, we can install Docker.
At long last, let’s check if Docker is working.

Installing Vaultwarden
Now that we’ve gotten Docker working, we can start working on setting up Vaultwarden.
First, we need to pull the Docker image for the server.

And now, to run the server, you can simply run:

Let’s break this down!
- The command “docker run” is to start up a new container based on a specified image.
- The argument “-d” tells Docker that we’re not concerned about staying connected to the output of the program once it’s running.
- The “–name” parameter, as you might expect, specifies the human-readable name of the container.
- Next, “-v” allows us to pass a folder from the host machine to the container. In our case, we want “/vw-data” on the host to become “/data” on the container. This is so that our data (passwords) can persist even if we need to recreate the container. (E.g, to update to a new version of VaultWarden).
- The “-p” parameter lets us proxy a port from the host to the container. Since we’re assuming that the host will already have a web server of its own, (and we’ll be installing one shortly) we tell docker that all traffic to/from the host on port 81 should be sent to port 80 (standard http port) on the container.
- The final argument is the name of the container image, which should match what we used in the “docker pull” command.
Web Server Setup
As mentioned above, unfortunately, we shouldn’t really be connecting directly to the container. If you have a preferred web server, feel free to use that. For this example, we’ll use nginx.
First, the simple step of installing nginx.

Next, we should disable the default configuration that’s shipped with nginx on most distributions.

Now, we need to make a config file for nginx. This process will differ slightly depending on if you have a domain name or not. If you don’t, I’d recommend snagging one, even if it’s just a free one from a site like Freenom. If the price of “free” is still too much, we can work with that too.
I have a domain name!
Let’s make a config file. For example:

In this file, we’ll put the following (if a domain name is used):
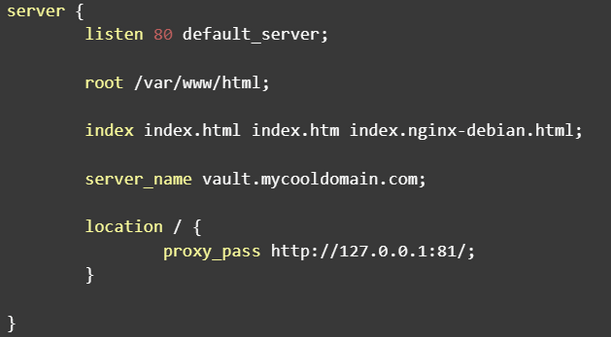
To get an HTTPS certificate, we’ll need an additional tool, but first, have you set your DNS?
All you’ll need for this simple example is an A record for the public IP of your server. Exactly how you set this will depend on your domain registrar and how they handle DNS.
You can use a tool like https://whatsmydns.net to check that your domain responds with the expected IP address. Once it does, you can move on.
Now, you can get started on installing Certbot, a tool by the Electronic Frontier Foundation (EFF).

Next, let’s make sure our nginx config doesn’t have any issues.

And, now, assuming there weren’t any “ERROR” blocks, we can restart nginx so that the changes are applied.

We can now finally get our HTTPS up and running. To start the process, run

You’ll want to select your domain name, and then enter a valid email address as a contact. Certbot will finish up by automatically editing your configuration file to redirect all traffic to https.
Assuming that there aren’t any error messages, all you need to do to finish up is restart nginx once again.

Now, you should be able to go to https://vault.mycooldomain.com and set up the first account for Vaultwarden.
I don’t (or can’t) have a domain name!
No worries. As mentioned earlier, we can still get HTTPS working. However, before you keep reading, note that HTTPS without a domain is strongly discouraged, and most browsers will continue to display scary warnings no matter how hard you try to tell them that everything is fine. You’ve been warned.
The first thing we’re going to do is create the certificate we need.

This command will ask for various details about your server before it’s done.
Next, we should create a strong diffie-hellman group. (See more on this here).

Now that we have the certificate files, we’ll create a snippet configuration file, which helps to keep our main file less cluttered.
Open the file with:

And insert:

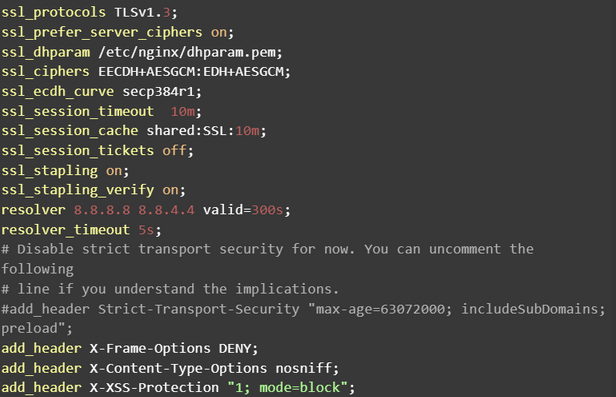
Now, we’re going to make another snippet to tell nginx about some specific recommended SSL settings.
Open a new snippet file with:

And now, insert:
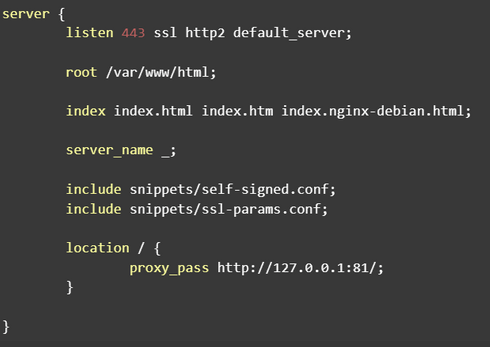
Whew. Now we can finally create the actual file that configures the proxy for Vaultwarden.

And insert the following:
Now, you can test the config with

And, assuming there are no errors, you can restart nginx with:

Now, at long last, you should be able to go to https://your_ip and set up the first Vaultwarden account.
Using Vaultwarden
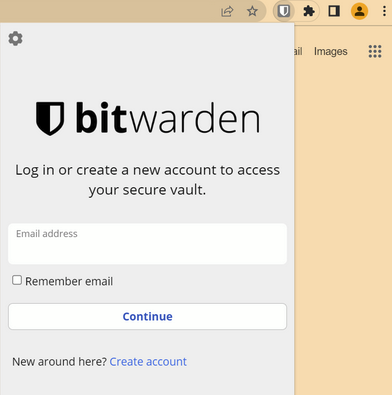
Now that you have an instance set up, you can use it! The simple way to start storing passwords and other sensitive information is to access the web interface, which is at your specified domain name or ip. When you load it, it should look something like this:
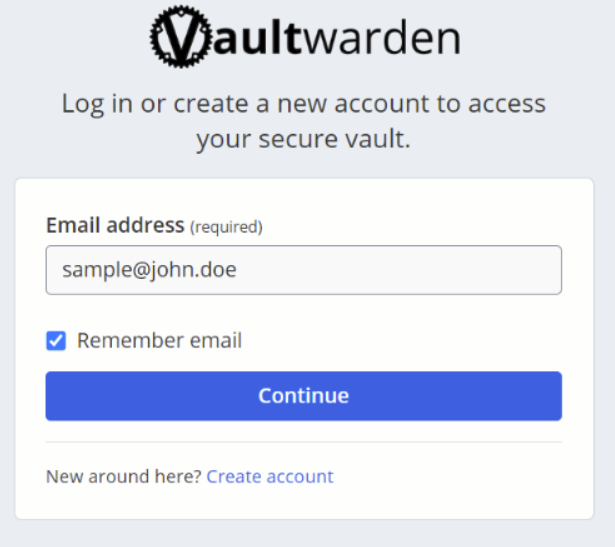
Since you’ve just installed the server, you need to make an account using the link below the continue button. After registration, you should be able to sign in and access your web vault.
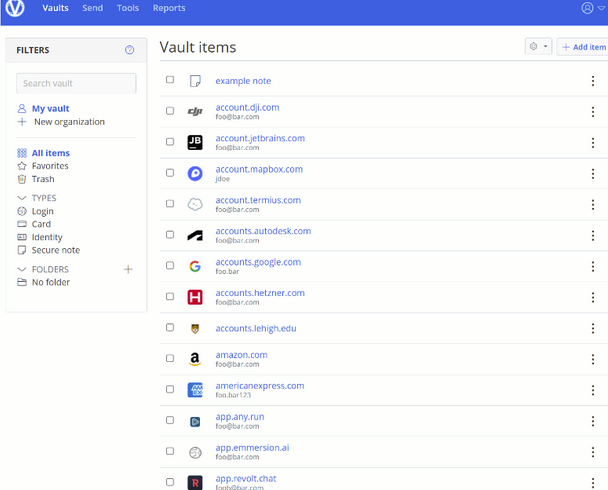
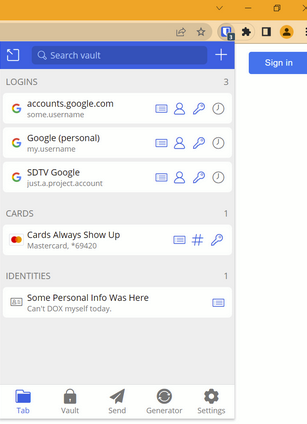
Your interface should look something like this, without all the clutter.
And this is all well and good, but a tad inconvenient. To make better use of Vaultwarden, you can install the official Bitwarden extension from the web/app store for your browsers/devices of choice. Here, I’ll demonstrate how to sign in to the Google Chrome extension, but the process is basically identical on any platform.
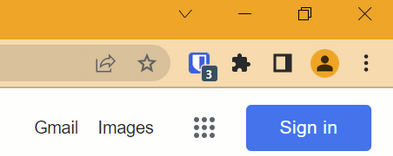
Once you’ve installed the extension from the webstore, click on the extension icon, which might be hiding behind the puzzle piece icon. If so, you can pin it to the toolbar with the pin icon.
Before you enter your email address, though, click on the gear in the top left of the sign-in panel.
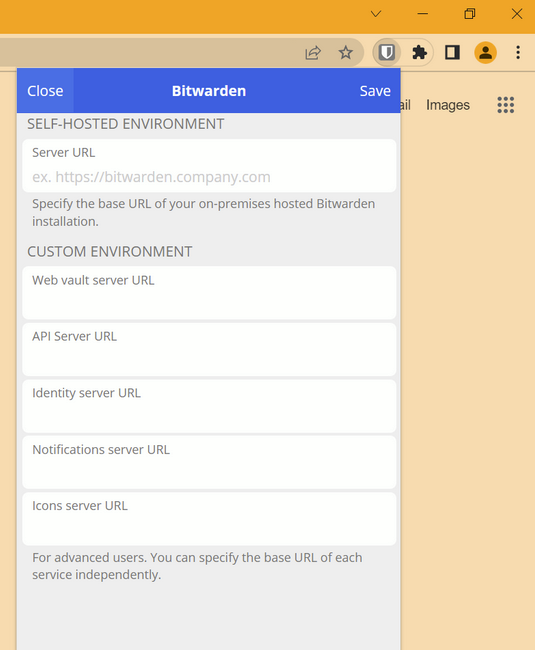
Luckily for us, we only have to edit the first box, “server url.” This should be set to the ip address or domain name of your vaultwarden server. (Either https://some.cool.domain or https://123.456.789)

Now, your email and password should work the same as on the web panel. Once you start saving passwords in your Vaultwarden, you’ll see an icon suggesting relevant items on pages. For example, when I go to google.com:
If I click on the icon, it expands to show relevant items.
Conclusion
With the instructions in this guide, your digital life can become more organized, while remaining equally, -if not more- convenient. At the same time, you can be more secure in the knowledge that your accounts are no longer secured with a password based on your dog’s name, your previous address, or any other easy-to-remember yet equally easy-to-guess details.